 (1)
(1)Measurement of e/m for the Electron
Introduction.
At the turn of this century several crucial experiments were performed which yielded a more basic understanding of matter. Two of these experiments involved a detailed characterization of the electron, one experiment in 1887 by J.J. Thomson measured the ratio of the charge e of the electron to its mass m by observing the motion of an electron in electric and magnetic fields. The second experiment, by R.A. Millikan some time later (1909), determined the charge on the electron by observing its motion in an electric field alone. Both experiments used a basic relationship in electromagnetic theory called the Lorentz force relation, namely
(1)
where F is the force on a particle carrying a charge q, moving with a velocity v in an electric field E and a magnetic field B.
Discussion of the Equipment.
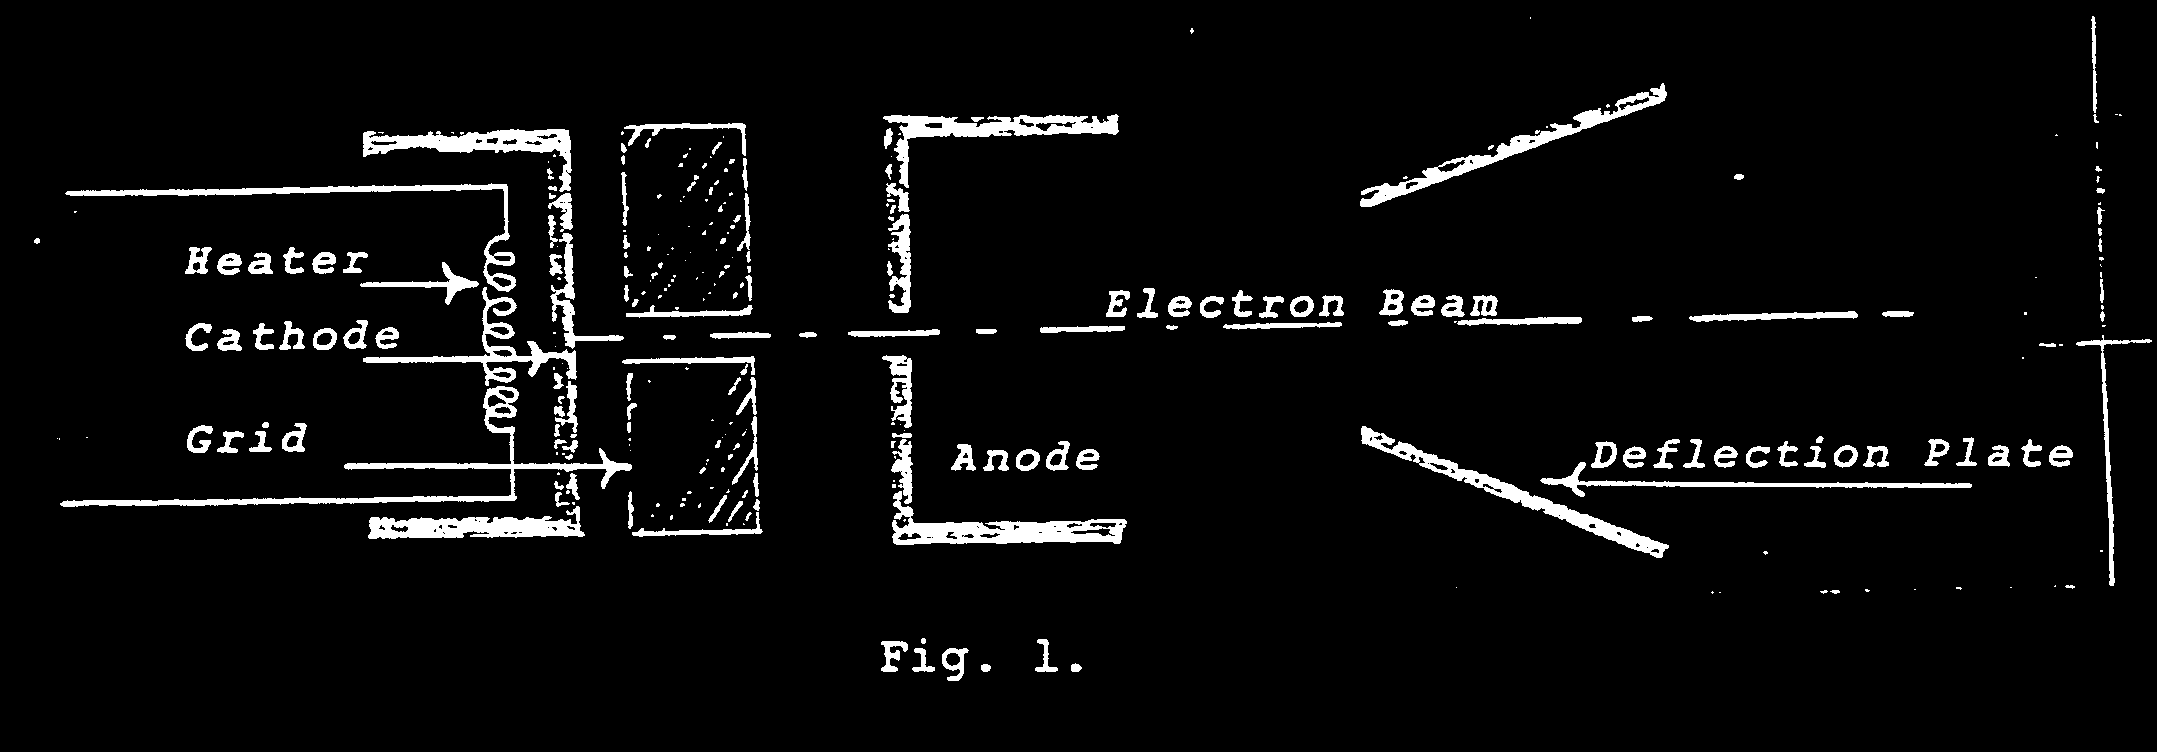 The experiment uses a special tube similar to the drawing above (this is a drawing of the apparatus we used to
use - the current version does not have "deflection plates) in which the
path of a beam of electrons can be observed directly. After the tube is evacuated,
a small amount of mercury is distilled into it. This mercury vapor is present
in the tube at the saturated vapor pressure. Electrons emitted by the heated
cathode are-accelerated by the potential difference applied between the cathode
and anode cylinder. Some of the electrons come out in a narrow beam through
a circular hole in the center of the cylinder. This emission is then focused
into a narrow beam by the grid of the tube. When electrons of sufficiently
high kinetic energy leaving the cathode (10.4 eV or more) collide with mercury
atoms a fraction of the atoms will be ionized. Upon recombination of these
ions with stray electrons, the mercury-arc spectrum is emitted and the characteristic
blue color of the undispersed visible light is observed (by undispersed,
we mean that it is not resolved into its components). Since recombination
and emission occur very near the point where initial ionization takes place,
the path of the beam of electrons is visible as the electrons travel through
the mercury vapor.
The experiment uses a special tube similar to the drawing above (this is a drawing of the apparatus we used to
use - the current version does not have "deflection plates) in which the
path of a beam of electrons can be observed directly. After the tube is evacuated,
a small amount of mercury is distilled into it. This mercury vapor is present
in the tube at the saturated vapor pressure. Electrons emitted by the heated
cathode are-accelerated by the potential difference applied between the cathode
and anode cylinder. Some of the electrons come out in a narrow beam through
a circular hole in the center of the cylinder. This emission is then focused
into a narrow beam by the grid of the tube. When electrons of sufficiently
high kinetic energy leaving the cathode (10.4 eV or more) collide with mercury
atoms a fraction of the atoms will be ionized. Upon recombination of these
ions with stray electrons, the mercury-arc spectrum is emitted and the characteristic
blue color of the undispersed visible light is observed (by undispersed,
we mean that it is not resolved into its components). Since recombination
and emission occur very near the point where initial ionization takes place,
the path of the beam of electrons is visible as the electrons travel through
the mercury vapor.
Computation of the Magnetic Field.
The magnetic field produced at the position of the electron beam by a current I flowing through the coils must be computed. For a single turn of wire, radius R, the field along the axis at a distance x from the plane of the loop is given by
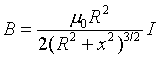 (2)
(2)
B is the component of the field normal to the plane of the loop and hence normal to the motion of the electrons and m is the permeability constant equal to 4p x 10–7 weber/amp.
For this equipment, there are two loops with N turns on each, the coils are connected to contribute equally to the field at the center, and they are spaced at the distance R from each other. Hence
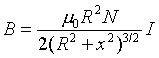 (3)
(3)
This arrangement is known as a pair of Helmholtz coils and has the advantage that the field is uniform in the region near the center. For the particular geometry and constructional details of this equipment
B = 7.88 × 10⁻⁴ I wb/m² (4)
Force on Electrons in the Magnetic Field.
For an electron moving in an orbit perpendicular to B, the centripetal force from (1), evB is balanced by the centrifugal force mv2/r , where r is the radius of the orbit, v is the velocity and e and m are the charge and mass of the electron.
Thus eB–mv/r=0 (5)
The velocity of the electron can be computed from the potential energy it loses in passing from the filament to the cylinder.
mv²/2 = eV (6)
Hence e/m = 2 V/B²r² (7)
And for this equipment then:
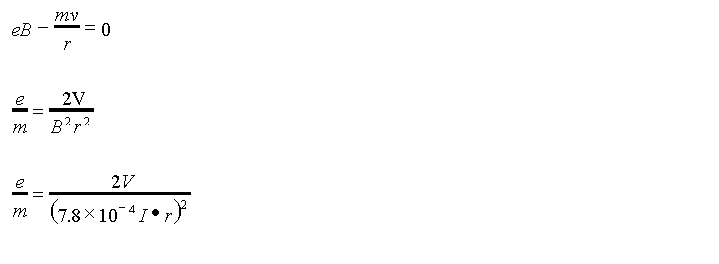 (8)
(8)
Experimental considerations:
NOTE: The directions below apply to the old "Cenco" apparatus. We are now using Daedelon apparatus. The changes will be indicated in lab, but in brief, the apparatus is much simpler: power supplies and meters are all on the apparatus, so external supplies and meters are not required.
(CENCO INSTRUCTIONS (I left these in for now incase we again need to use the CENCO apparatus. The CENCO instructions are "grayed" however. To perform the experiments possible with this apparatus the following power supplies and measuring equipment are required.
(1) The Helmholtz coils and the mirror scale lamp requires a 6-9V. D.C. 2 A. We use the laboratory 0–10 V dc supplies. The current through the coils should be determined to 1%: the laboratory multi-meters are adequate for this purpose.
(2) The electron gun unit requires a filament supply of 6.3V A.C. or D.C. at 1.5A and a high voltage D.C. source of 150-300V D.C. at l0mA. The accelerator voltage has to be determined accurately; again, the laboratory multimeters will do the job - but be careful to avoid electric shock; the beam accelerating voltage is dangerous.)
Experimental Procedures.
In order to remove small effects due to the earth's magnetic field it is advisable to orient the whole apparatus. (Note: this should be discussed quantitatively in your notebook.) Take a regular magnetic compass and determine the plane of the earth's magnetic field at the location of the equipment. Then set the equipment in position so that the plane of the Helmholtz coils lies in the plane of the earth's magnetic field which (from equation (1)) will then exert no force on the electrons.
Next, turn the current adjust control to zero and set the switch on the front panel to the e–m position. Connect the power supplies and meters to the unit being careful to observe the polarities stated on the front panel. The current meter has to be connected in series with the current supply and the accelerating voltage is monitored using the two jacks on the front panel. At this point nothing should be connected to the terminal jacks labeled "Deflect Plates." All power supplies should be "OFF" up to here. Ask the instructor to check your wiring before proceeding!
Turn on the heater supply and allow two minutes for the filament to heat up. Apply 200 volts to the anode. A beam will now be observed on the glass envelope opposite the anode.
Next, adjust the current through the coils and observe (and note) how the beam curves up into the sphere of the tube and eventually bends over to complete a full circle. (You will want to note the direction of the magnetic field, and confirm that the deflection is in the direction expected)
Adjust the current through the coils to zero, then reverse the direction of the current. Observe now that the beam is deflected in the opposite direction into the stem of the tube. Set the current to zero and re-connect observing the stated polarity. Determine the direction of the field for the two polarities.
Now rotate the glass envelope and observe the spiral path of the electron beam. Account (in your laboratory book) for this in terms of the vector relation (1).
In order to determine e/m, the plane of the electron beam should be set accurately parallel to the plane of the Helmholtz coils. First, using the focus control obtain a well defined beam (if a variable voltage filament supply is available, a well defined beam may be obtained by reducing the filament power somewhat); now rotate the glass envelope so that the electron beam after traveling a full circle passes between the two metal struts which lead the power to the filaments.
Set I at some fixed value say 1.5A. Measure r the radius of the orbit for various settings of the accelerating voltage. Plot v against r and use the gradient of the graph to determine e/m. Note r is measured using the anti-parallax mirror system, in practice one obtains two values r1 and r2 and r is taken as the arithmetic mean of these two values.
Now set v at some fixed value, say 200V. Then determine r for various settings of I, the current through the Helmholtz coils Plot I against the curvature 1/r and determine e/m from the gradient of the graph.
Finally, make a set of readings simultaneously varying I and V but keeping the radius of the orbit constant such that you can measure a diameter directly using the parallax mirror scale. Again determine e/m from the gradient of the graph.
There are three quantities needed in order to compute e/m. Errors in each of these contribute to errors in e/m. Be sure to use the rules for the combination of errors in your discussions of uncertainty.
As is the case is virtually every experiment you will do, you will want to "linearize the results." That is, you will want to make a plot of your data in which e/m is the slope. A note from earlier semesters: try fitting your data without assuming that the line you will be fitting necessarily goes through zero. For reasons of which I am not sure, it appears (with the Cenco apparatus, maybe not with the Daedelon.) that a best fit may come if you allow a non-zero intercept. You should discuss this. You should also use EXCEL to investigate the sensitivity of your results to variation in you numbers.
Interaction of Electrons with an Electric Field.
Equation (1) states in general terms the mode of interaction of an electron with an electric field. With this apparatus it is possible (NOT) to explore the relationship in a qualitative way. In order to perform these experiments an additional power supply and meter are required. For most of the experiments, it is possible, however, to parallel the accelerating anode and deflection plate connections. Ask the instructor if additional supplies are available. If not, follow the procedure below.
Set the switch on the front panel to the "electric deflection" position. Turn the current control for the Helmholtz coils to zero. Set V to about 200 volts and note the deflection of the electron beam, observe how this deflection varies as the voltage is varied about the 200 volt position. What is the sign of the charge on the electrons? Observe what happens if the beam hits the deflection plates -- explain this. (If you use separate supplies, you can leave the accelerating voltage V fixed, and vary the voltage across the plates independently, making the same observations.)
J. J. Thomson determined e/m (in 1897! Three years ago marked the 100th anniversary) by observing the effect on the electron beam of the simultaneous application of electric and magnetic fields. Using this equipment it is possible to crudely simulate his experiment. Obtain first a deflected beam using the electrostatic deflection plates, then turn up the current through the coils; note an increase in the deflection. Reverse the current through the coils and adjust the current through the coils until the deflection due to the magnetic field more or less cancels out the deflection due to the electric field - this is the substance of the Thomson experiment. It is not possible here to make this experiment quantitative because of the inhomogeneous nature of the electric field. Thomson used a pair of parallel electric field deflection plates which enabled him to determine quantitatively the effect of this field on the beam. However, it is possible to make very approximate calculations by obtaining a rough estimate of the mean distance between the plates and the length of the electron path through the plates. Using these two rough estimates, assume that the deflection plates are parallel and compute the effect of the field. This procedure yields answers with an accuracy of 25% (at best).
Equipment:: Daedelon e/m apparatus
meter stick
Tensor lamps.